CHAPERONg Tutorial 1
Automated MD Simulation of Ubiquitin in Water

A tutorial on how to use CHAPERONg for automated GROMACS molecular dynamics simulation of a protein in water.
0. Introduction
This tutorial is the first in a series of tutorials that illustrate how to utilize CHAPERONg for automated GROMACS MD simulations. Here, with the only objective of giving you a taste of the convenience that CHAPERONg offers, we will cover just the minimal MD simulation of a protein in water– using ubiquitin as an example. If you haven’t performed MD simulation with GROMACS before (or any MDS at all), you may want to start with some basic tutorials to get familiar with the foundations of MD simulations and GROMACS itself. There are many excellent tutorials available such as those of Justin Lemkul, the Strodel Group, the Bonvin Lab, or those on the cgmartini website including the newer and older tutorials.
- Carry out a 1 ns MD simulation of ubiquitin in water using the
semi-automode of CHAPERONg. - Calculate and construct the plot of the secondary structure elements for the trajectory.
- Make a movie of the simulation trajectory.
1. Preparing the Starting Structure
The starting structure of the protein that we will be working with is crystal structure of the human erythrocytic ubiquitin–PDB ID 4GD6. Download the coordinates file from the RCSB PDB and copy it into your working directory where we will be carrying out all the subsequent actions in this tutorial. Note that it is not uncommon for crystal structures to have some deficiencies (such as refinement inadequacies as well as missing atoms and residues that could not be placed in the electron density), in which case such deficiencies would first have to be addressed before proceeding with the simulation. For researchers with the appropriate expertise, it is always a good and encouraged practice to first inspect the electron density map of the structure of interest to ensure that the PDB model fits the density well enough—especially at regions of particular importance to the study. Fortunately, the 1UBQ structure which we will be using in this tutorial is free from any major defects and can be directly used for MD simulation.
Crystal structures are often not without deficiencies. These include problems such as refinement inadequacies, as well as missing atoms and residues that could not be placed in the electron density. Some of the refinement issues could be fixed by fectching structures from the PDB-REDO databank which contains updated and optimised versions of deposited crystallographic PDB structures. However, missing non-terminal heavy atoms and residues certainly need to be re-built to make a starting structure usable for MD simulation. Many tools and servers are available for this purpose. Examples include free tools like Modeller, the protein repair and analysis (PRAS) webserver and software, OpenMM’s PDBfixer, DeepView/Swiss-PdbViewer, and the paid software Maestro/Prime (from the Schrödinger suite).
2. Cleaning up the Starting Structure
Go (cd) into your working directory. Remove any undesired molecules in the crystallographic structure. Here, we will discard all the ligands co-crystallized with the protein. This may not always be the best practice in all cases. However, for this tutorial, we are only interested in the ubiquitin apoprotein. Atoms of non-protein molecules (ligands and H2O) in PDB structures are often labelled as “HETATM” (hetero-atoms). Enter the command below to clean the structure by removing the hetero-atoms and writing the coordinates to the file 1UBQ_clean.pdb.
|
|
You can also achieve the above using any of your favorite visualizers (PyMOL, Chimera, Discovery Studio, Maestro, etc.). Save the clean strucure into the working directory as 1UBQ_clean.pdb. A copy of the cleaned apo structure from the above command is available here.
3. Forcefield and MD Parameter Files
There are a number of forcefields that GROMACS supports natively and are available by default upon GROMACS installation. The list of these forcefields–including AMBER, CHARMM, GROMOS, and OPLS–and their various distributions are provided in the relevant part of the GROMACS documentation which you can directly access via this link. In this tutorial, we will be using the OPLS-AA forcefield.
4. Define CHAPERONg Parameters
The parameters that specify how CHAPERONg passes in inputs to GROMACS and control the outputs therefrom can be set using one (or both) of two options:
- One way is to configure the parameters into the CHAPERONg parameter file paraFile.par and pass it into CHAPERONg while lauching the program. You would find the paraFile.par in the CHAP_utilities folder present in the CHAPERONg package that you have downloaded/can download here. Alternatively, you can download a copy of the parameter file via this link. The paraFile.par contains self-explanatory comments.
- The second way is to specify the parameters as command line flags to CHAPERONg while launching it.
You can find more details about each of the available parameters by going through the relevant part of the CHAPERONg documentation.
5. Launching CHAPERONg
Before you run CHAPERONg, you need to copy all the required GROMACS MD simulation parameters files. Name these files as:
- ions.mdp – mdp for the adding ions step
- em.mdp (or minim.mdp) – mdp for the energy minimization step
- npt.mdp – mdp for the NPT equilibration step
- nvt.mdp – mdp for the NVT equilibration step
- md.mdp – mdp for the production simulation step
You can click here to download a folder containing all the input files for the simulation we will be running in this tutorial. If you want to use these downloaded files, enter the commands below to extract the folder and cd into it:
|
|
|
|
In the folder you will see a set of .mdp files and paraFile.par (the CHAPERONg parameter file). Open paraFile.par with a text editor to see what parameters have been set for the current tutorial. The command below launches CHAPERONg with the parameter file passed to it.
|
|
Note that the input starting structure is specified in the command with the -i flag. This is because that was not set in paraFile.par as you might have noticed. We could, alternatively, also launch CHAPERONg using the command below:
|
|
The alternative command above achieves the same result as the one before it, except that the parameters were spelt out in the command rather than using the parameter file. Note that you can also combine both approaches. However, in a case where a parameter is specified both on the terminal and in paraFile.par, that of the terminal overrides the one in the parameter file. After launching CHAPERONg, the code will prompt you to choose the type of simulation (conventional or enhanced sampling) you wish to perform. The simulation of ubiquitin in the tutorial is a conventional one. You will thereafter be prompted to indicate the type of system you would be simulating (protein-only, protein-ligand, or protein-DNA). Since we are simulating the protein only, we will select accordingly. Next, you will choose the stage to start the simulation from. We will start from the very first step, and the simulation will then proceed automatically till the completion of the production MD stage.
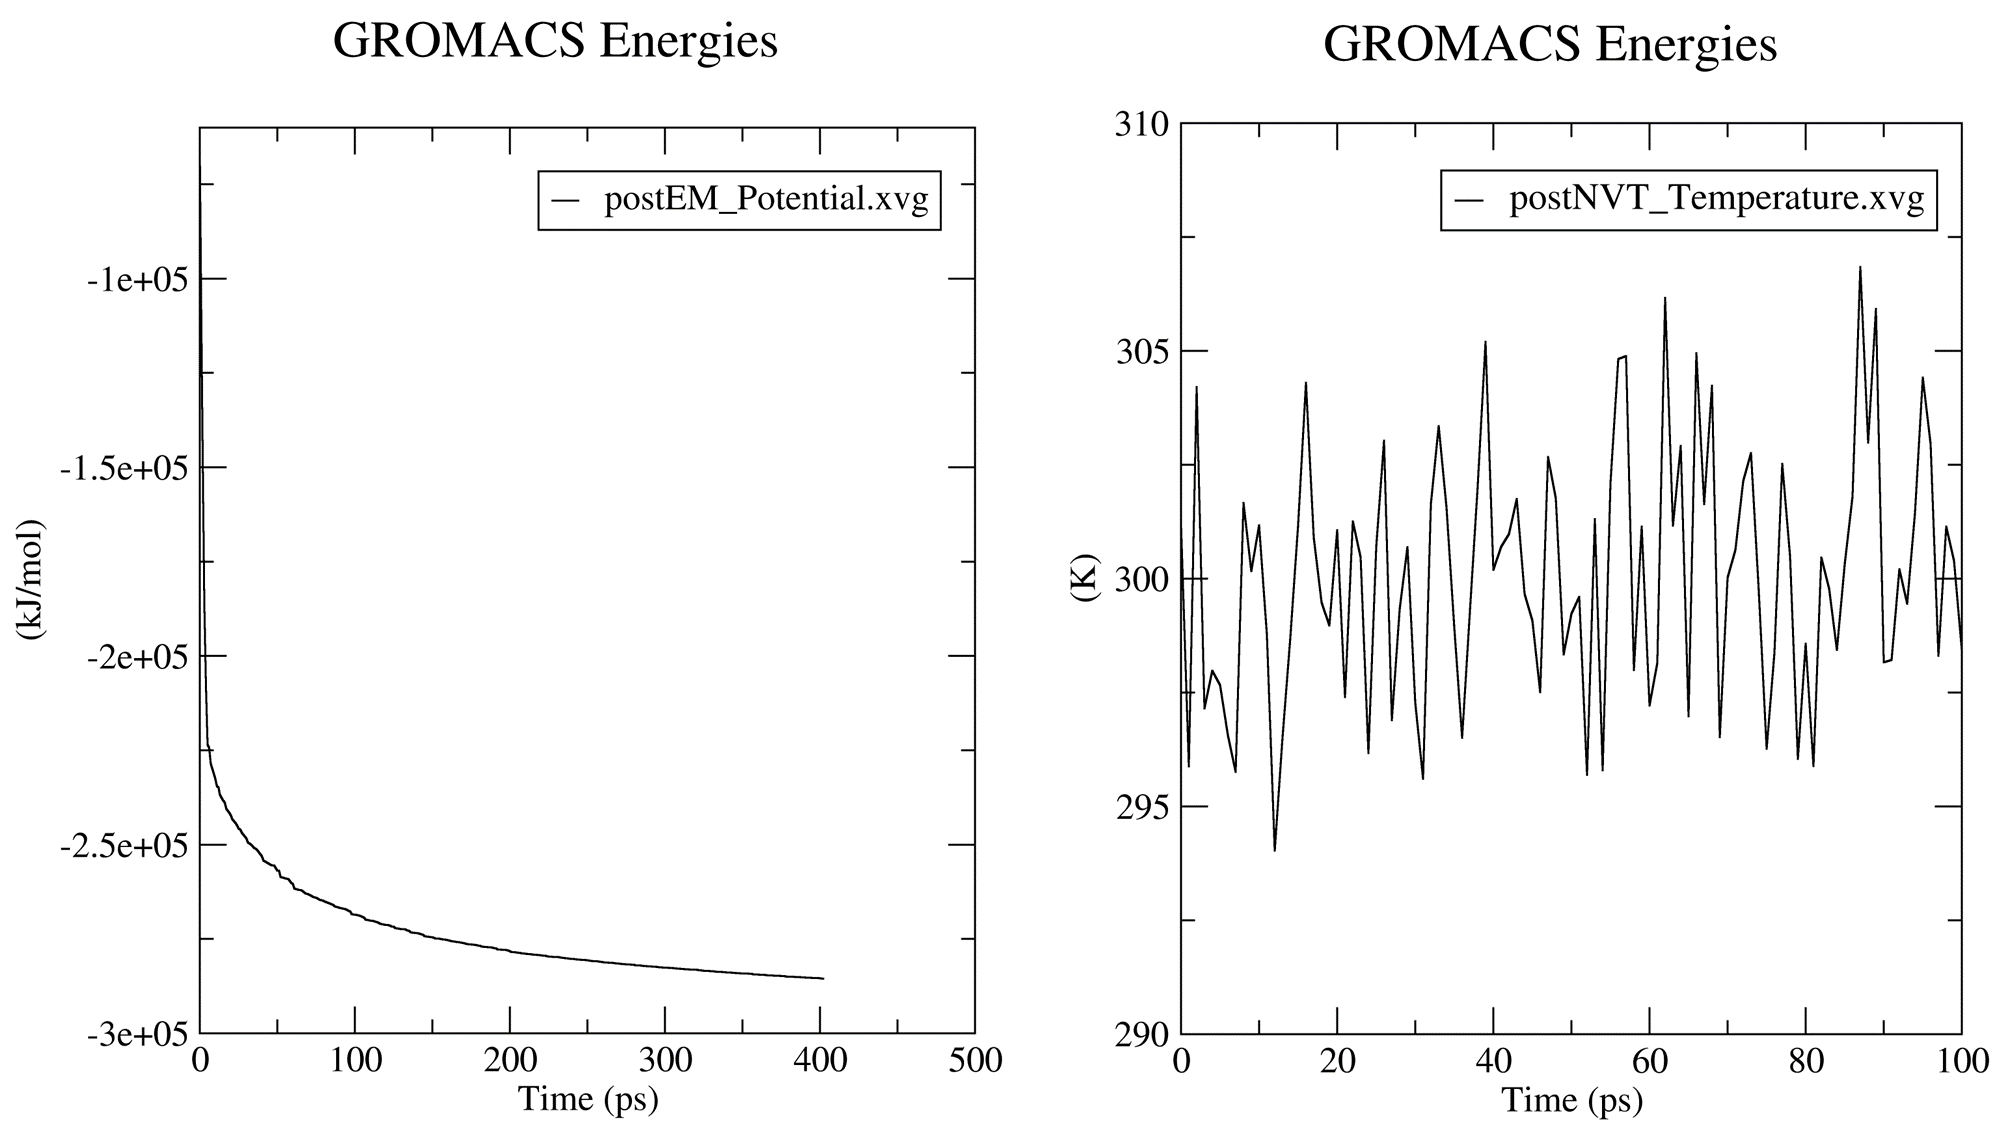
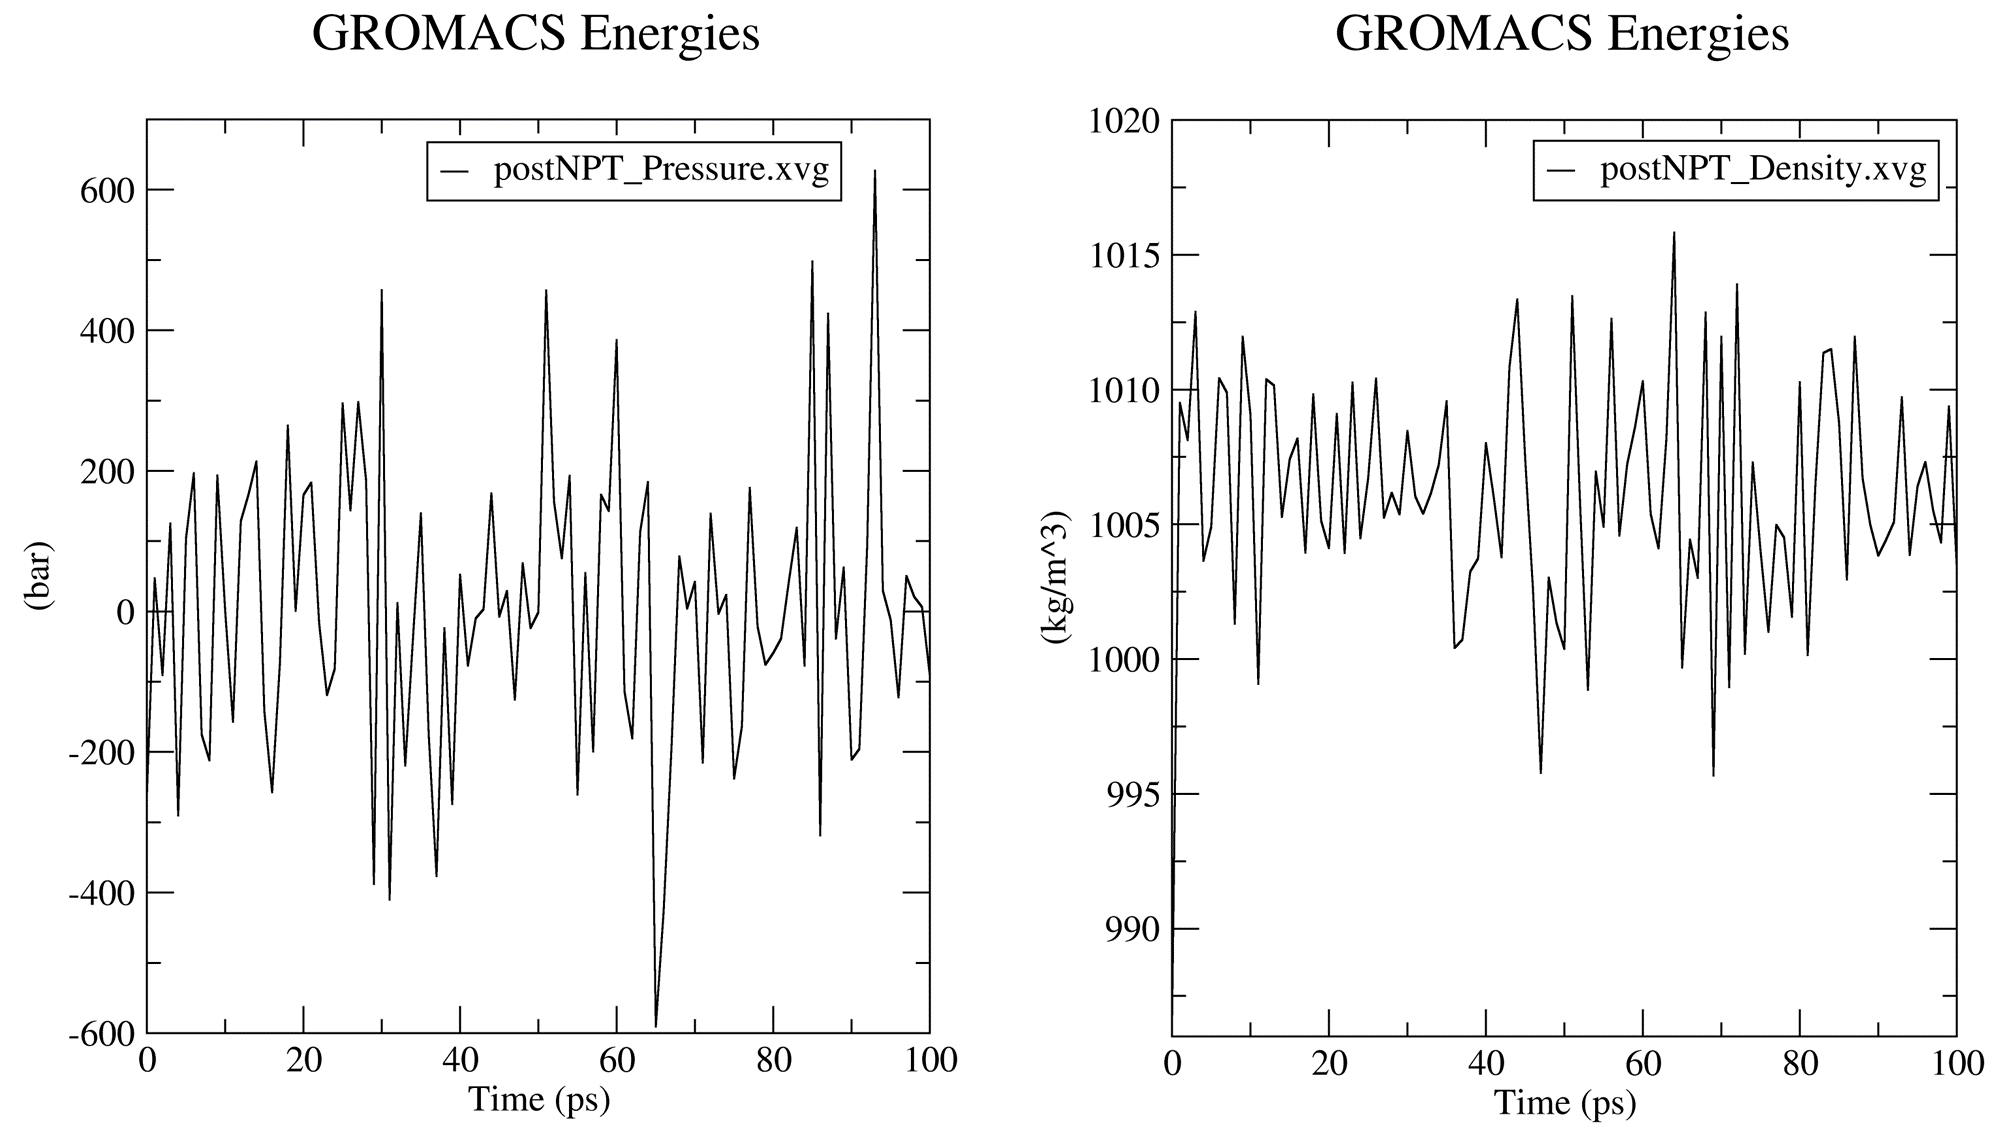
6. System Preparation Quality Assurance Checks
Prior to the production MD stage, CHAPERONg automatically carries out some quality assurrance checks by extracting some thermodynamic parameters, including the Potential Energy term upon the completion of the energy minimization step; and the Density, Pressure, and Temperature terms once the corresponding equilibration steps are completed. You can see more details about these in the relevant part of the documentation. The .XVG output of the plots and the .PNG images are saved in the working directory in a subfolder named postEM_thermodynamics. The figures generated are shown below:
6. Post-simulation Trajectory Analyses
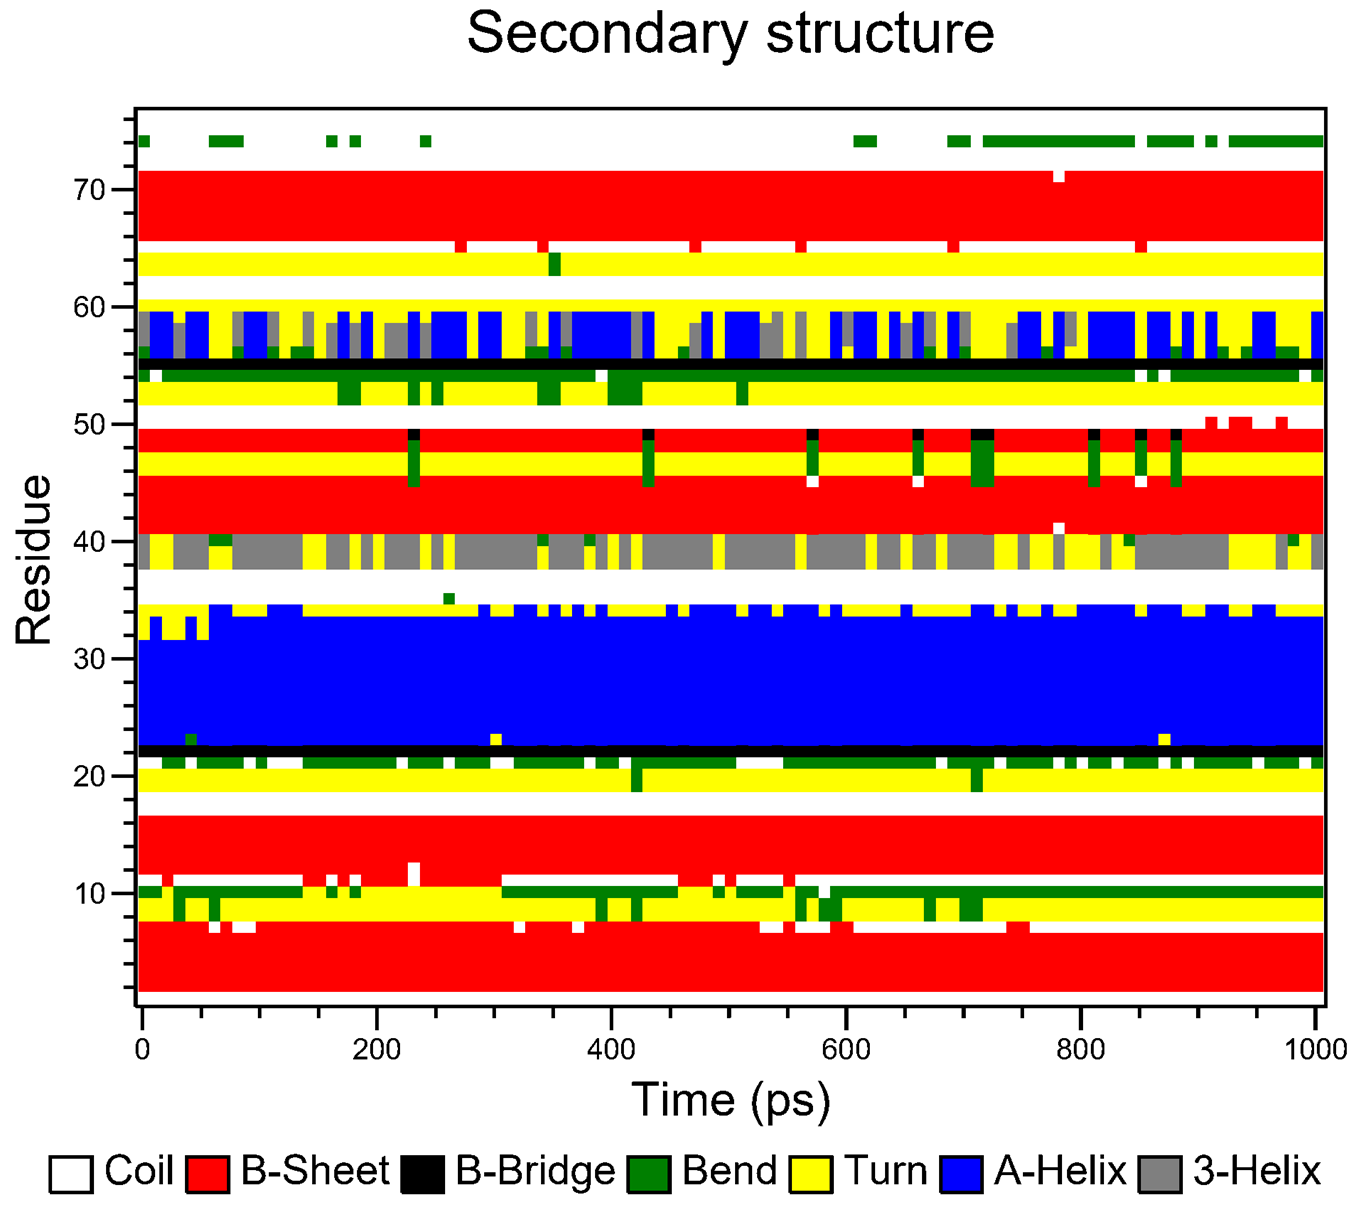
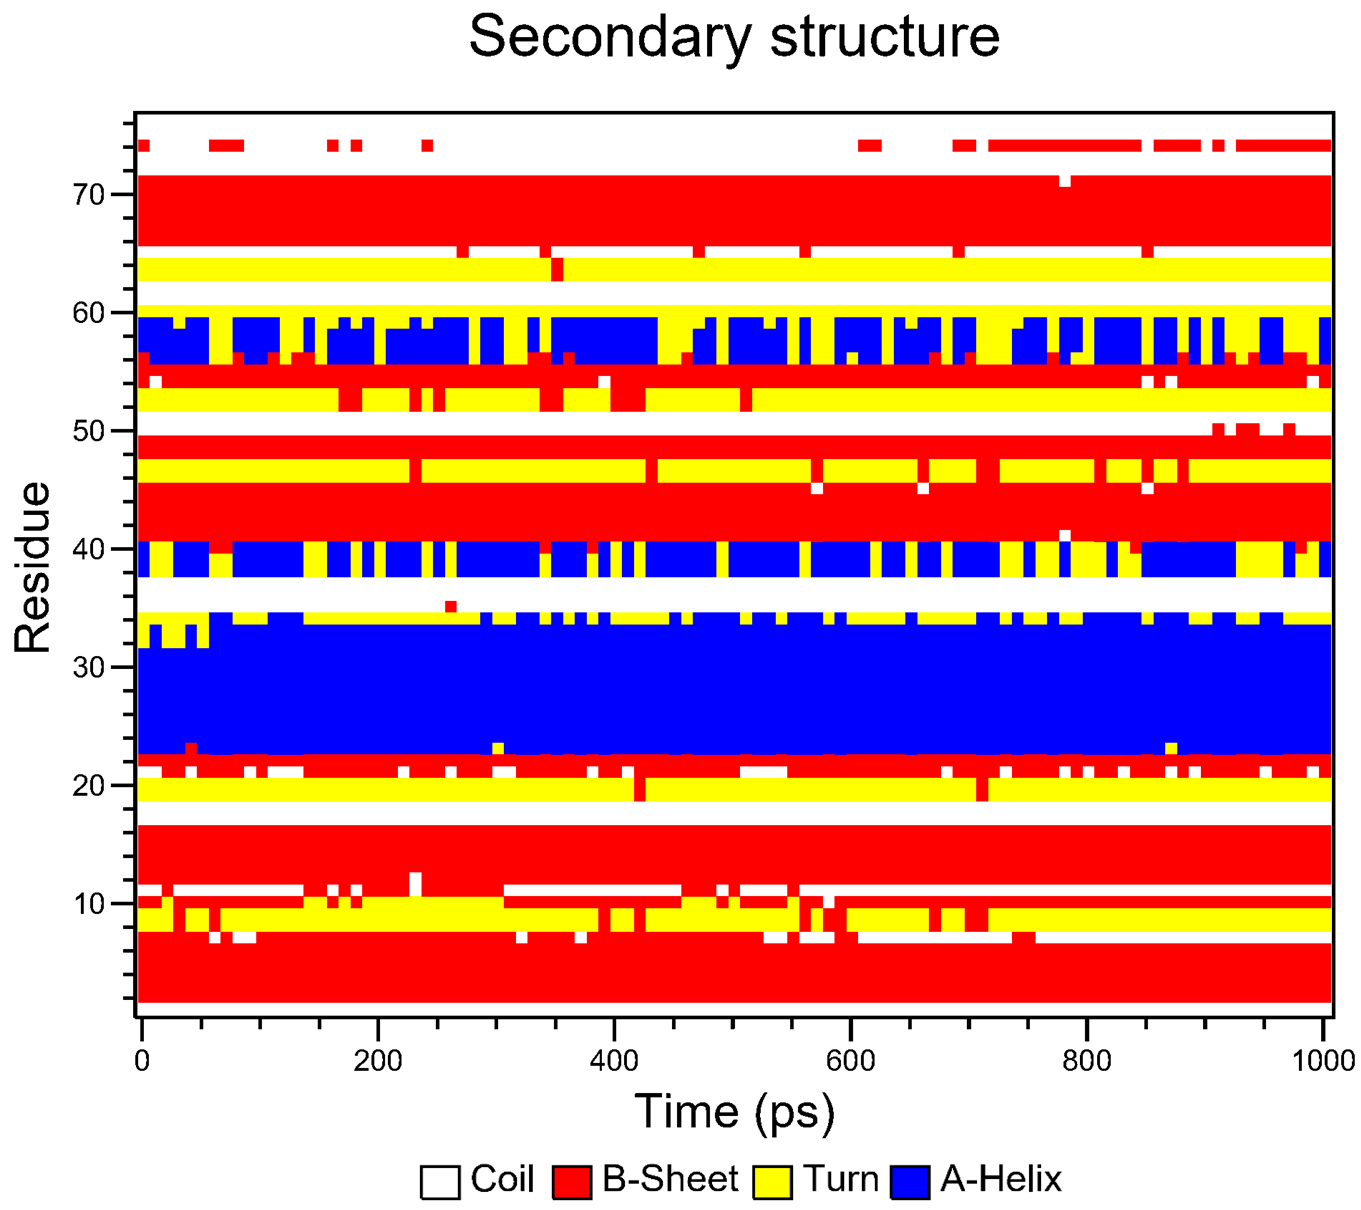
After the production run is completed, you will be prompted to indicate whether you would like to proceed to post-simulation analysis. Select yes. In this tutorial, we saved just 100 frames (based on the parameters in the md.mdp file) from the simulation trajectory. Hence, in addition to the qaulity assurance analyses that CHAPERONg automatically carries out post-minimization and post-equilibration as described above, we will only be carrying out two additional analyses, viz, construction of the secondary structure plot and generation of a movie of the trajectory. So, enter 0 8 10 at the prompt to proceed with the Recenter, rewrap & correct molecules for pbc, Secondary structure analysis, and Make a movie of the simulation options. Because we set semi for the auto_mode parameter in paraFile.par, you will be prompted to manually provide inputs to some GROMACS parameters. You can bypass these manual inputs and have CHAPERONg automatically handle them by using full for the auto_mode parameter in paraFile.par.
When prompted (i.e. for the pbc correction), enter 1 to center on the protein and then 0 to select System for output in the next prompt. For the secondary structure calculations, if you do not have DSSP installed on your machine, or CHAPERONg is unable to locate it because the environment has not been properly set, you will be prompted to decide whether you would like to use the DSSP executable packaged with CHAPERONg. Eventually, a subfolder named Secondary_structure will be created containing the plots of the secondary structure elements over the course of the simulation. The plots are represented in both the standard DSSP 8-colour format and the CHAPERONg-simplified 4-colour format (see Figures below).
For the movie, you will be prompted to indicate the number of frames to extract for the movie. Enter 1 to proceed with the default number of frames. In this case, all the 100 frames will be used. In the next prompts, enter 0 to select the System, and 0 or 1 to select System or Protein for the output trajectory. From here on, CHAPERONg will call on the appropriate and available tools to handle the movie generation. Finally, a MOVIE folder will be created in your working directory which contains a .gif and/or a .mp4 movie(s), as well as a PyMOL .pse session file of the frames of the trajectory. Open the movie and you should see something like the following:
In case you would like to adjust the positioning of the protein in the movie or, say, to display certain parts or residues of the protein, open the PyMOL session file (with PyMOL), adjust the display as you would like it to be in the movie, save the PyMOL session and quit PyMOL. Then run CHAPERONg again to regenerate a movie using the session file you just saved:
|
|
Select option b in the prompt that comes up asking whether to make an entirely new movie or to adjust the previous using the newly saved PyMOL session. For example, below is a movie produced after adjusting the one above. You can find more details about generating movies using CHAPERONg in the relevant part of the documentation which you can directly find here.
To download the entire directory of the simulation that we have just completed, click here. In the next tutorial, we will run a longer simulation, save more coordinates, and carry out a more detailed analysis of the simulation trajectory.
I try my best to make the information on this website as accurate as possible, but if you find any errors in the contents of this page or any other page on this website, kindly get in touch with me at contact@abeebyekeen.com. Also, you are welcome to reach out for assistance and collaboration.